In a recent post I explained how I implemented a “push to Slack” button using the Wemos D1 (ESP8266) board, programmed with the Arduino-like interface. Having discovered that it is possible to use MicroPython on the board, now I will re-write the software in Python.
In order to do so, the first thing to do is install the MicroPython firmware on the board. These are the steps to achieve that first milestone.
Download a firmware for the ESP8266.
Install
esptool.py:
python3 -m venv esptool
source esptool/bin/activate
(esptool) pip install esptool
Connect the board and take note of the port (e.g.
/dev/ttyUSB0) that shows up in the output ofdmesgcommand.Erase the flash memory of the board:
esptool.py --port /dev/ttyUSB0 erase_flash
- Flash with the firmware:
esptool.py --port /dev/ttyUSB0 write_flash -fm dio -fs 32m 0 esp8266-20170108-v1.8.7.bin
I found that particular esptool options in this thread, after struggling with the fact that the board was restarting continuously when I flashed it without options. It seems that the full 16MB of the board are not accessible, at least at the moment.
- Install
picocomand connect to the serial interface:
picocom -b 115200 /dev/ttyUSB0
- You should see the MicroPython REPL:
MicroPython v1.8.7-7-gb5a1a20a3 on 2017-01-09; ESP module with ESP8266
Type "help()" for more information.
>>>
- In case you don’t see it, do a button restart of the board and try again.
At this point, we have MicroPython installed on the board. Now, we’ll have to connect it to a WiFi network and enable remote upload so that we can upload our script.
- Connect it to a WiFi network and take note of the IP address:
>> import network
>> sta_if = network.WLAN(network.STA_IF)
>> sta_if.active(True)
>> sta_if.connect("<YOUR_SSID>", "<YOUR_PASSWORD>")
>> print('IP address:', sta_if.ifconfig()[0])
In order to enable remote upload, connect to the MicroPython REPL via picocom and run:
import webrepl_setup
Would you like to (E)nable or (D)isable it running on boot?
(Empty line to quit)
>
Press (E)nable and set a password.
Finally, download the webrepl client and you will be able to upload the main.py file to the board with this command:
./webrepl_cli.py main.py <YOUR_IP>:/main.py
Now that we have our development environment ready, let’s start the coding. MicroPython works executing two files: first boot.py and then main.py. If they finish executing (or you interrupt the execution with Ctrl+C), then it will resort to the MicroPython REPL, for interactive usage. In order to implement the Slack button, we will create a main.py file.
First, we will create two helper functions to perform the connection to the WiFi and to send messages to Slack. In order implement the latter, we will use the urequests library, that is included in the MicroPython standard firmware, and that mimics the famous Python requests library:
import network
import urequests
import time
from machine import Pin

def wifi_connect(ssid, pwd):
    """
    Connect to a wifi 'ssid' with password 'pwd'
    """

    sta_if = network.WLAN(network.STA_IF)
    ap_if = network.WLAN(network.AP_IF)
    if ap_if.active():
        ap_if.active(False)
    if not sta_if.isconnected():
        print('connecting to network...')
        sta_if.active(True)
        sta_if.connect(ssid, pwd)
        while not sta_if.isconnected():
            pass
    return 'IP address: %s' % sta_if.ifconfig()[0]

def to_slack(slack_hook_url, slack_icon_url, slack_message, slack_username):
    """
    Send the 'slack_message' using an incoming webhook
    """
    data = {
            "link_names": 1,
            "icon_url": slack_icon_url,
            "username": slack_username,
            "text": slack_message
           }
    res = urequests.post(slack_hook_url, json=data)
    return res.status_code == 200
As you can see, the code is certainly more compact than with the low-level Arduino version.
You can find examples of usage for the different libraries included (network, machine, etc..) in this tutorial.
Finally, we will have to create the main loop, that is quite similar to the Arduino version:
if __name__ == "__main__":

    SSID = "<YOUR_SSID>"
    pwd = "<YOUR_PASSWORD>"
    slack_hook_url = "<SLACK_HOOK_URL>"
    slack_icon_url = "<SLACK_ICON_URL>"
    slack_message = "<SLACK_MESSAGE>"
    slack_username = "<SLACK_USERNAME>"
    led_pin = 0 # D3
    button_pin = 12 #D6

    wifi_connect(SSID, pwd)

    led = Pin(led_pin, Pin.OUT)
    button = Pin(button_pin, Pin.IN, Pin.PULL_UP)

    while True:
        # Button pressed
        if not button.value():
            print("The button has been pressed")
            ok = to_slack(slack_hook_url, slack_icon_url, slack_message, slack_username)
            # If succeed, light the LED during 1s
            if ok:
                print("Succeded posting to Slack")
                led.high()
                time.sleep(1)
            else:
                print("Failed trying to post to Slack")
            led.low()
            time.sleep_ms(10)
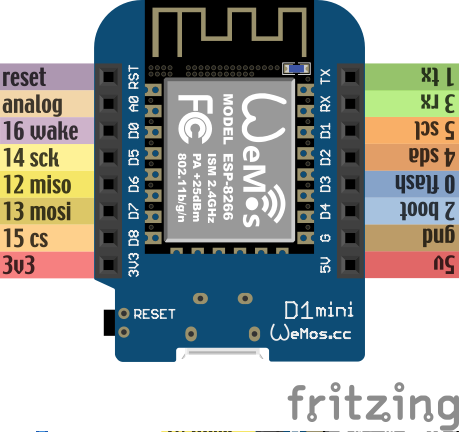
Take on account that the D3 and D6 pins of the board correspond to the GPIOS numbered 0 and 12, as depicted in this image:
You can find the complete script here. Upload it and it should start working.
Follow these links if you want to learn more: